Twenty-four hours after completing our assault on the National Training Center’s largest urban objective, Razish, I took two pages of notes on the things that I felt made us successful. Like all lessons in the Army, none of these are new or novel. And, like all lessons at NTC, just because you know what you need to fix doesn’t always mean that you can pull it all together in the face of the short timelines, harsh conditions, and the ever-present 11thArmored Cavalry Regiment. Here are my top 5.

#1 – Dedicate the force needed to get to the objective
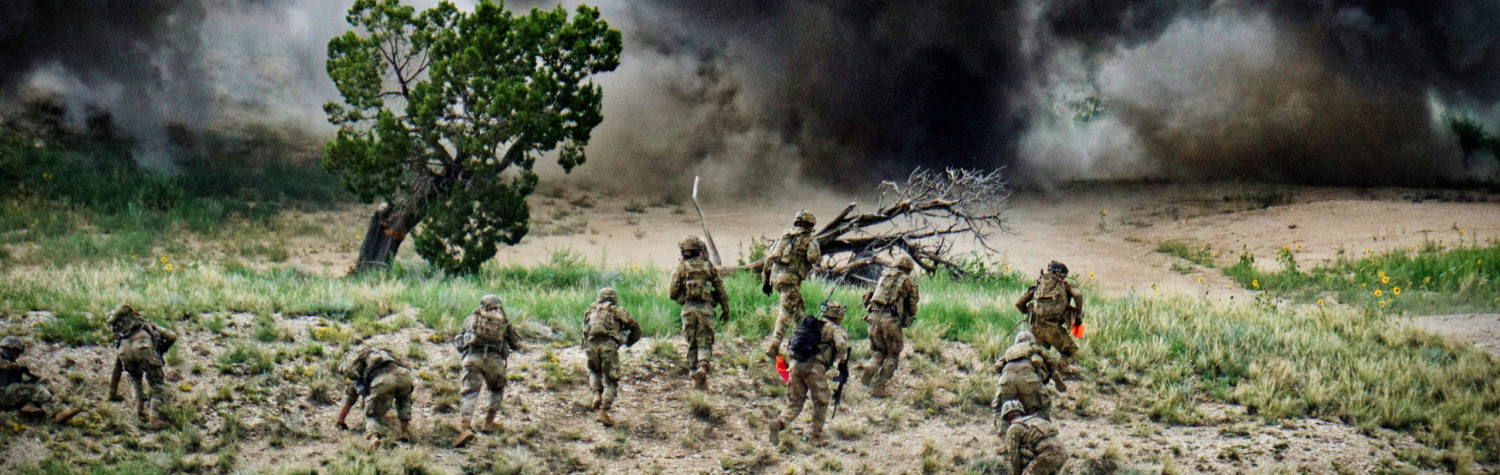
Full disclosure – we attacked Razish twice. As you can guess, round one did not go well (more on that in part two of this article). We failed to reach the objective with enough combat power because we didn’t dedicate the force necessary to truly establish the security zone. An enemy mechanized company delayed our approach for seven hours in the central corridor. This forced a piecemeal attack by our support force, disrupting our breach and degrading the assault.
In round two, the BCT used the cavalry squadron and the Japanese 72nd Tank Regiment to screen, clear the central corridor, and support the breach. The difference was significant. They destroyed the enemy mechanized infantry company. Now, we had the necessary combat power to screen and clear. We isolated, breached, and assaulted through the breach with minimal resistance. Dedicating nearly two BNs to the security zone fight prevented the brigade from doing other things with those forces in adjacent corridors. But it ensured success for the mission at hand. As opposed to a seven hour fight and significant loss of combat power, we reached the city in a little more than two hours and with nearly the entire force intact.
#2 – Synchronize your warfighting functions to ensure timely and accurate pre-assault fires
We always plan for pre-assault fires, but pulling it all together to deliver the desired effects is often easier said than done. Units have to determine the right PIR and pair it with the right NAI. Then they have to align it against an effective collection plan. Once they answer the PIR, they have to confirm or refine the targeting location and pass it throughout the operational, intelligence, and fires enterprises. And before the commander gives his or her approval, the staff has to collect collateral damage estimates, confirm positive identification, and present an accurate assessment of risk versus reward. The more targets, the greater the workload; and the greater the workload, the longer it takes to complete. We’ve all experienced the frustration when a single gap in this chain prevents effective fires, causes delay, or even prevents a successful assault. Here’s how our team approached the problem.
Prioritize Targets, Layer Assets, and Control Fires
First, we prioritized targets that we believed would have the greatest impact on the overall fight. These included air defense, electronic warfare, command & control, and then fortified fighting positions. Next, we layered fixed-wing ISR, ground reconnaissance, and our support force (positioned in key terrain above and southwest of the city). Multiple forms of ISR provided depth and all-weather reconnaissance. ISR helped gain an accurate picture of the enemy, refine the pre-assault fires plan, and adjust target locations.
An hour prior to the combined arms breach, scouts and leaders in the support by fire confirmed which buildings were being used for fortified fighting positions. We passed that information across both command and intel nets. Then we adjusted targeting data for precision guided strikes across the fires net. The BCT COIC possesses the capacity to control ISR, maintain overall situational awareness, and are in close proximity to the BCT Commander who holds decision authority for pre-assault fires. For these reasons, the COIC managed all strikes prior to assault. Once we opened the breach, the BCT passed down control of fires to the assault force commander.

Positively identifying enemy positions, changing targeting data, confirming collateral damage estimates, and gaining approval for PGM strikes within an urban area all takes time. Units have to dedicate the resourced required (planning, time, force, etc.) to prioritize targets, communicate those priorities, and resource their servicing to achieve the desired effects. Units often place responsibility for pre-assault fires on the support force, assault force, or the FSCORD instead of making it a BCT fight. Clearly all of those commanders need a vote, but by making this a BCT fight, 1/25 SBCT guaranteed our assault force was attacking a degraded and disoriented enemy versus one who remained fully intact.
#3 – Fix from one direction and attack in mass from the other
Attacking a large city like Razish from multiple directions presents the enemy with multiple dilemmas. It forces the enemy to commit combat power to multiple problem sets, thereby reducing the size of their force facing the friendly breach and assault elements. In our experience, attacking from two directions is absolutely the way to go. But, deciding how much combat power to commit becomes the ultimate problem. The BCT is simultaneously managing other problems aside from Razish. Instead of attacking in earnest from two directions, fixing from one side and attacking from the other may be more effective. We achieved the desired effect of drawing enemy combat power away from the point of penetration by using a smaller fixing force in the southwest while attacking in mass from the east.
Our sister battalion initiated their support by fire from the high ground southwest of the town, forcing the enemy to keep combat power in the west to repel the attack. Then they conducted a dismounted breach of the enemy’s outer obstacle. Simultaneously, our main breach and assault force began attacking from the east. The enemy was decisively engaged from two directions. They couldn’t determine which force truly possessed the greatest combat power and were forced to defend both sides of the city simultaneously.
Unit’s can establish a support position, breach the town’s outer obstacle, and seize one to two smaller zones in the southwest with one to two companies plus a sapper platoon. This would for additional combat power for the main assault in the east. At the end of the day, the rotational unit must properly allocate and prioritize combat power against the many problem sets it is trying to overcome. Fixing the enemy from one side and attacking from the other can be more effective than attacking from two directions.
#4 – Use mass & tempo to overwhelm the enemy
With a battalion minus fixing in the southwest, a battalion plus can attack in mass from the east. They can overwhelm the enemy’s mobile defense within the city. Within Razish, the enemy intends to inflict mass casualties from fortified positions. They plan to do this as the rotational unit moves through the outer obstacle and into the city. Once friendly forces seize a foothold, the enemy will maximize their agility and small teams to retrograde into the city. They will try to lure the assault force into engagement areas. They will withdraw again, but this time try to envelop or attack from behind. To negate this threat, friendly forces need the combat power to rapidly clear and control the city.
 We cleared Razish with three companies, but four would have been ideal. We broke the city into zones and assigned one to each company. Company #1 cleared the easternmost zone to secure a foothold. Companies #2 & #3 cleared the next two zones in parallel. Company #1 pushed into zone four, which we identified as key terrain. Companies continued to clear zones in sequence or parallel based on the situation. The zones allowed for battalion-level control while giving companies freedom to press the fight building to building.
When clearing in parallel, company cross-talk was invaluable. The two units stayed abreast and prevented small enemy teams from infiltrating the other company’s lines. With effective communication laterally and vertically, companies were able to maintain momentum. And, battalion was able to anticipate and reposition units or key weapon systems to fight deeper into the city.
#5 – Place leaders across the battlefield to ensure success
Regardless of how good your plan, the enemy gets a vote. Leaders have to position themselves at points of friction. Position amplifies or diminishes the ability to press the fight, overcome unexpected obstacles, and give clear guidance. For this attack, we generally replicated doctrine with leader placement. And, surprise…it was very effective.
The XO and OPS SGM fought from our BN TOC, providing intelligence updates and operational assessments. They helped clear fires and reported to higher headquarters. The TAC moved across the battlefield and controlled different portions of the fight. The S3, FSO, and battle captain positioned themselves at the support by fire outside of the town controlling the fight and fires. I initially positioned myself with the SBF but then moved with the second company for most of the fight. This enabled me to keep an accurate sense of the battle and an ability to press the fight when needed. But of all our key leaders, the most critical in my mind was where we placed our Senior Enlisted Warfighter: the BN CSM.
The Command Sergeant Major
As the most experienced NCO in our organization his presence and position on the battlefield motivated the force in the face of a determined enemy. When there was confusion during transition, my most trusted NCO was there to provide face-to-face clarity with the lead element. When there was friction, his experience and decisive leadership helped a subordinate unit get onto their objective.
There were two times during this assault where the CSM’s presence were vital. First, the initial assault to seize a foothold. Second, a company-to-company passage of lines to seize our decisive point. While battalion to company communication was effective throughout, there was no substitute for having the battalion’s senior enlisted warfighter at the greatest point of friction. The CSM’s presence was key to maintaining the needed pressure on a vulnerable enemy. He allowed companies to focus on fighting the enemy, the environment, and their own friction.
—
In the end, there are plenty of ways to attack Razish and other large urban centers. None of these tips are new. But, when facing multiple problem-sets, a short suspense, and a determined enemy, one has to task prioritize. These are the top 5 things that our team did to achieve success.
Did you like Part I? Click the link below to SUBSCRIBE and receive Part II tomorrow!
Subscribe to The Company Leader!